The first 50 people who link their photo into our special Mr. Linky today will have the opportunity to receive feedback on their photo from our contributors and participants.

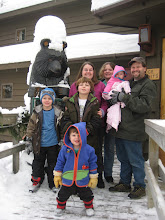
Here is the photo I am entering:

I ♥ Faces asks that if you are entering a photo for Constructive Feedback you follow a few simple directions:
1) Please choose only one face photo that you have already edited. You can post the original photo and you can have multiple edits of that particular photo in your post...
.JPG)

2) You will need to put our i heart faces button in your blog post.

3) Make it clear to your regular readers that you are asking us to give you Constructive Feedback on your photo. We don't want to upset them when we stop by to do just that and they are wondering why anyone would "critique" or "put down" your photo. :)
Oh, please "critique" away ... I love to learn from others advice!
4) Let us know what editing program you use for your photos.
I use Picasa3 for editing and webalbums right now. I hope to invest in Photoshop Elements soon. I took this picture with my Canon PowerShot SD980 IS Digital Elph set to auto
5) If you know how to find this information, it'd be wonderful if you could put the EXIF data for your photo in your blog post. (This tells you what your aperture, shutter speed, ISO and focal length were when you took the shot. An example: f/6.3 1/100 sec ISO 100 230 mm)
Sorry I don't know how to find the info
8) What exactly is bothering you about your edited photo? (Is the skin tone off? Does the overall color in the photo just feel too warm? Do you feel like the crop job could be better? etc.) Let us know so that we'll know how to help you.
Below is a quick snap shots of the photos I had taken by a photographer on our Easter vacation in Hawaii of back in 2008 (Mary was not born yet, so we obviously did not have her picture taken there) but I found a dress matching the line I had the big kids dressed in that Easter, so sat her on the grass in our yard last summer and tried to take a few pictures of her so I could frame and hang pictures of all 5 kiddos up together. The photo of Mary is so obviously a snap shot and the other 4 so obviously professional it looks silly hanging up together. Any one have any suggestions how to adjust my picture so it fits better with the big kids ones?

9) Each of our contributors puts a tremendous amount of time into the feedback that they do leave. We ask that you please visit the blogs of the people who leave you feedback to thank them for their kindness shown to you today!


9 comments:
Hi! This is what I came up with:
http://dailydualities.blogspot.com/2010/03/editing.html
I put it on my blog only because I could not figure out how to add the picture to this comment. You can probably pull the pic off my blog if you want. I will delete the whole post once I hear back from you that you got the feedback. (Just cause it seems a little weird to me to have your pic there!)
I know this is after the fact but it might help if you decide to take another photo to add to the series on the wall. :) First, I would have placed the baby straight on the grass and not have the white quilt/blanket in the shot. Second, I would have placed her in the grass where the light is the same throughout. See the dark shadows of the grass behind her and the light color of the grass where she is at? I would have placed her so that everything in the image would have been lighted the same. From a quick look, that's what I see.
Hi, I'm Dana a contributor with iHeartfaces. Thank you for linking your photo.
First, your daughter is BEAUTIFUL.
And I have to say, I really LOVE your edits! The second one to me would look very nice hanging with the others. But here's a little hint that might help you. Try blurring out the background just a touch and see if that helps.
Cameras have a LOT to do with that "professional feel" you were talking about, but blurring out that background a little may help with that.
The first edit is very nice, but that second one REALLY is lovely! I love how you still have just a touch of that sunflare on her! And I especially LOVE the crop!
I'm gonna play with it a bit and see if I can't help you with it and then I'll post a link to it.
OK, in working with the photo a little bit, I can help you out a little more. Shooting in DIRECT sun is so harsh on the subject, that's were you get those really bright spots where it is overexposed. And because the sun is BEHIND her, you get the underexposed face and the dark shadows under her eyes.
So, what I did is, made a new layer, then use the SELECT tool and marked from the blanket, all around her, to the very edges of the photo. Then I used the Gaussian blur set to only about 3.5% and blurred out that background. After that, I used my blur tool to go around the edges to blend them altogether.
Then I went into levels and pulled up the midtones to brighten up her pretty little face, and moved the shadows down just a little bit to add dimension to the photo. Then I dodged her undereye circles and then used my clone tool to get rid of as much of the shadow as I could (this I did quickly as I am short on time, you will want to take a little more time with this so it's not so splotchy. LOL)
Then I sharpened using 80/1/0.
You had just a little yellow/green colorcast so I went into my color balance and pulled the magenta up just a touch and the blue up just a touch to help balance the color. You could also go into hue and saturation and reduce the green if you didn't want it so bright. Your choice.
For fun, I did a PW seventies action on it, and added a little sunflare to the one you already had!
http://photos.danasuggs.com/fif
Thank you for letting me play with your photo!
Oh, also...check out this tutorial: http://thepioneerwoman.com/photography/2008/08/open-shade-is-your-best-friend/
If I were you, I would try a reshoot. In your photo, you have your daughter out in the sun. It seems like it would be the idea setting, but in actuality, sun is really hard to work with. You need to find somewhere with nice even lighting.
I noticed that there are lots of shaded areas around your daughter. Try placing your daughter in the shaded area but facing towards the light. Make sure that you have her in the shade well enough that light is not going to blind her. The indirect light will make her eyes pop, and the lack of overhead sunlight will avoid any harsh shadows.
Also, lay on the ground, right on her level. This will bring her fully into the frame. Make sure your zoom is extended as far as it will go and reposition yourself on the ground so that your daughter fills most of the frame. By zooming in, you will be maximizing the use of your point & shoot, and could possibly get that blurry background which makes a photo look more professional.
Pay attention to light on your daughters face. Make sure that there is not blotchy light. If there is...reposition her. Also, look at her eyes. Are they catching the light? If not, again, try to reposition her. I know it's hard to get babies to stay still, so be patient if it doesn't work the first time around.
What is really going to make the difference in this photo is proper lighting, creating a blurry background and composing the photo properly. I would love to see the results if you try to take the photo again!
Hi! What lovely children you have :). I think you can edit this one to go on the wall. Or take her out and take more, LOL. It's a good excuse to take more pictures and practice!
I lightened the photo considerably, cloned the grass and did a quick color correction. That's it :).
Color: http://i7.photobucket.com/albums/y286/NanasMama/May2009088edit.jpg
Keep taking pictures of that cutie!
Amanda J.
Wow!!! This was great! Thanks for the comments and help everyone!
Post a Comment